Battery switch on travel trailer function is key to managing your RV’s power. Understanding how your battery switch works is crucial for preventing dead batteries and ensuring a smooth camping experience. This guide breaks down the different types of switches, their operation, troubleshooting tips, and essential safety practices, empowering you to become a confident RV owner.
We’ll cover everything from the basics of single and dual switches to more advanced isolators, explaining the advantages and disadvantages of each. You’ll learn how to diagnose problems, perform routine maintenance, and even upgrade your system if needed. Get ready to master your travel trailer’s electrical system!
Battery Switch Types in Travel Trailers
Choosing the right battery switch for your travel trailer is crucial for managing power efficiently and safely. Different types offer varying levels of control and complexity, impacting both your setup and your budget. Understanding the pros and cons of each will help you make an informed decision.
Single Battery Switches
A single battery switch is the simplest type. It’s essentially an on/off switch for your single house battery. This is suitable for trailers with only one battery and minimal power demands. It’s easy to install and inexpensive, but offers limited functionality. You can only connect or disconnect the battery from the trailer’s electrical system.
Dual Battery Switches
Dual battery switches allow you to control two batteries independently. This is common in setups with a house battery and a starting battery for the tow vehicle. Many dual switches offer three positions: “Both,” “Battery 1,” and “Battery 2,” allowing you to use both batteries simultaneously, or isolate one while using the other. This offers greater flexibility and prevents accidental draining of your starting battery.
So, you’re prepping for your awesome travel trailer adventure? First things first: understanding your power. Check out this guide on the battery switch on travel trailer function to avoid any dead-battery surprises. Knowing how to manage your power is key, and once you’ve got that sorted, you can focus on other important trip details, like insurance.
Securing your trip with a solid travel insurance plan is crucial, and Aon travel insurance is a popular choice; research your options to find the best fit for your needs and budget before you hit the road.
Installation is slightly more complex than a single switch, but remains relatively straightforward.
Battery Isolators
Battery isolators are automatic switches that prevent the house battery from draining the starting battery, and vice-versa. They allow both batteries to charge independently while the engine is running but automatically disconnect them when the engine is off. This is a significant advantage, preventing a dead starting battery. However, isolators typically aren’t as precise as manual switches in managing power distribution, and can add to the overall cost.
Different types of isolators exist, including diode isolators (simpler, slightly less efficient) and relay-based isolators (more complex, more efficient).
So, you’re gearing up for that awesome travel trailer adventure? First things first: make sure you understand the battery switch on travel trailer function – it’s crucial for keeping your lights and appliances running. Once that’s sorted, don’t forget about travel insurance! Consider checking out Aon travel insurance for peace of mind on the road.
Getting this sorted early means you can relax and enjoy the journey without worrying about unexpected issues.
Comparison of Battery Switch Types
| Feature | Single Switch | Dual Switch | Battery Isolator |
|---|---|---|---|
| Number of Batteries Controlled | 1 | 2 | 2 (automatically) |
| Control Type | Manual | Manual | Automatic |
| Cost | Low | Medium | Medium to High |
| Installation Complexity | Low | Medium | Medium |
| Flexibility | Low | High | Medium (automatic control limits flexibility) |
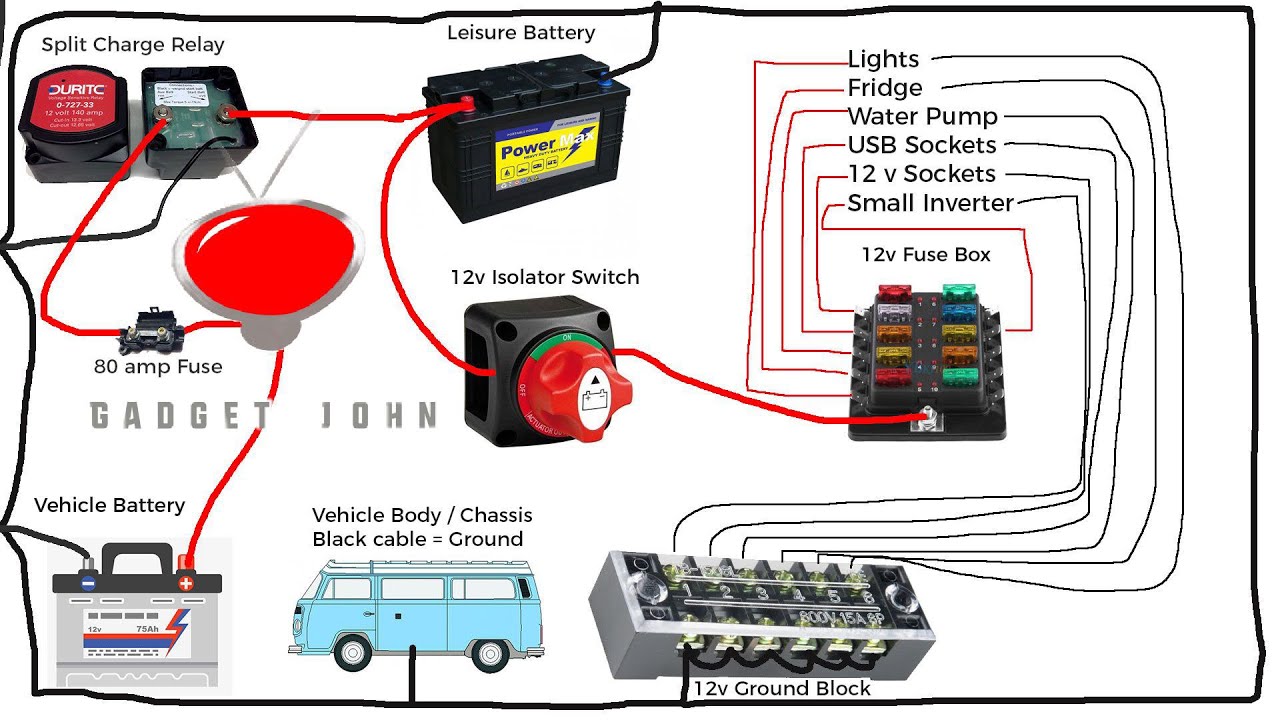
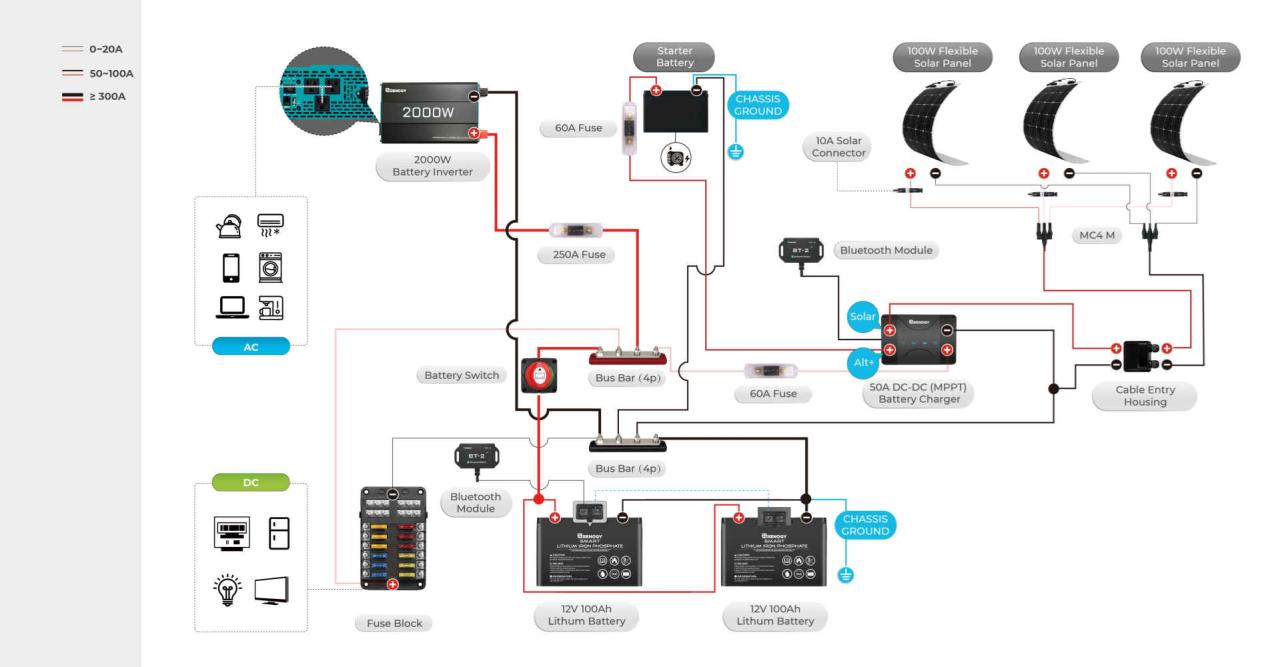
Wiring Diagrams
A single battery switch simply connects the battery to the trailer’s electrical system with a single wire running through the switch. A dual battery switch has two sets of wires, one for each battery, connecting to the switch and then to the trailer’s system. The wiring for a battery isolator is more complex, involving connections to both batteries and the vehicle’s charging system, often incorporating a voltage sensor.
Detailed diagrams are readily available online from various manufacturers and RV electrical supply retailers, and should be consulted before undertaking installation. Incorrect wiring can lead to damage to your batteries or electrical systems.
Function of the Battery Switch
The battery switch in your travel trailer is a crucial component of its electrical system, acting as a central control for your house batteries. It’s essentially a master on/off switch that allows you to disconnect your house batteries completely from the rest of the trailer’s electrical system. This seemingly simple function has significant implications for power management and preventing damage.The battery switch manages power flow between the house batteries and the trailer’s charging sources, such as the tow vehicle’s charging system or a shore power connection.
When the switch is in the “on” position, power from the house batteries can flow to the various appliances and systems within the trailer. Conversely, when the switch is “off,” this power flow is completely interrupted, preventing the batteries from being drained by any parasitic loads (small electrical draws even when devices are turned off). The charging system can still charge the batteries even when the switch is off, depending on the specific switch type.
Battery Switch and Power Flow Management
The switch acts as a gatekeeper, selectively allowing or blocking the current from your house batteries. This prevents accidental discharge of your batteries when your trailer isn’t connected to shore power or your tow vehicle. Imagine leaving your trailer for an extended period; without the switch, small draws from things like clocks or carbon monoxide detectors could slowly drain your batteries, leaving you stranded when you return.
A properly operated battery switch prevents this scenario.
Preventing Battery Drain
The primary purpose of a battery switch, especially when the trailer is stored for a long time, is to completely isolate the house batteries from any potential drain. Even seemingly insignificant loads can add up over time, significantly reducing battery life and potentially leaving you with dead batteries when you need them most. By switching the batteries off, you eliminate these parasitic draws, preserving your battery’s charge for when you’re ready to use your trailer.
This is especially important during periods of non-use, such as winter storage.
Operating a Typical Battery Switch
Operating a typical battery switch is straightforward, but understanding the correct procedure is vital. Most switches have clearly marked positions, typically “On,” “Off,” and sometimes an intermediate position.
- Locate the Switch: The battery switch is usually found near the batteries themselves, often in a compartment accessible from the outside of the trailer.
- Identify Switch Positions: Carefully examine the switch to understand its positions. “On” allows power to flow to the trailer’s systems. “Off” completely disconnects the batteries. Some switches have a “Start” or “Aux” position for starting the trailer’s appliances using the battery.
- Turn the Switch “Off”: To disconnect the batteries, turn the switch to the “Off” position. This will prevent any drain from the house batteries.
- Turn the Switch “On”: To reconnect the batteries, simply turn the switch to the “On” position. Ensure all systems are working correctly after turning the switch back on.
Remember to always consult your travel trailer’s owner’s manual for specific instructions related to your battery switch and electrical system. Improper operation can lead to electrical problems or damage to your batteries.
Troubleshooting Common Battery Switch Issues
Dealing with a malfunctioning battery switch in your travel trailer can be frustrating, leaving you without power when you need it most. Understanding the common problems and how to troubleshoot them can save you time, money, and a lot of aggravation. This section will guide you through identifying and resolving typical battery switch issues.
Common Battery Switch Problems and Troubleshooting Steps
Several issues can arise with your travel trailer’s battery switch. These often manifest as a complete lack of power, intermittent power failures, or the inability to switch between battery banks correctly. Let’s examine some of the most frequent problems and their solutions. The first step in any troubleshooting process is safety: always disconnect the negative terminal of your battery before working on any electrical components.
Visual Inspection and Basic Checks, Battery switch on travel trailer function
Before diving into more complex diagnostics, a thorough visual inspection is crucial. Check the switch itself for any obvious signs of damage, such as loose wiring, corrosion, or physical damage to the switch housing. Inspect the fuses both in the switch and any related fuse boxes. A blown fuse will usually be visibly burnt or broken. If you find a blown fuse, replace it with a fuse of the same amperage rating.
If the new fuse blows immediately, there’s a short circuit somewhere in the system – you’ll need to trace the wiring carefully. Also, verify that the switch is firmly in the correct position (battery on/off, or between battery banks). A loose connection at the switch or a faulty switch itself can cause problems.
Flowchart for Diagnosing Battery Switch Problems
The following flowchart visually Artikels a systematic approach to troubleshooting your battery switch:[Imagine a flowchart here. The flowchart would start with a “No Power” or “Intermittent Power” box. Branches would lead to checks like “Check Fuses,” “Inspect Switch for Damage,” “Check Battery Connections,” and “Test Switch Operation.” Each check would lead to either a “Problem Solved” box or another check, eventually leading to a “Consult a Professional” box if the problem remains unresolved.
The flowchart would be a visual representation of the troubleshooting steps Artikeld in the table below.]
Common Symptoms, Causes, and Solutions
| Symptom | Potential Cause | Solution |
|---|---|---|
| No power to any appliances | Blown fuse(s) in the battery switch or main panel. | Replace the blown fuse(s) with fuses of the correct amperage. If the fuse blows again immediately, there’s a short circuit; consult a professional. |
| Intermittent power | Loose wire connection at the battery switch or elsewhere in the system. Corrosion on terminals. | Tighten all wire connections. Clean any corroded terminals with a wire brush and battery terminal cleaner. |
| Incorrect switching between battery banks | Faulty battery switch. Incorrect wiring. | Try switching the switch several times to see if it is a simple sticking issue. If this doesn’t resolve the issue, the switch may need replacing. If wiring is suspect, trace the wiring diagram and verify the connections are correct. |
| Battery switch won’t turn on/off | Internal failure within the switch mechanism. Power supply issue to the switch. | Check for power at the switch. If no power is present, trace the wiring back to the source. If power is present, the switch itself likely needs replacing. |
Upgrading or Replacing a Battery Switch
Replacing your travel trailer’s battery switch is a straightforward task that can significantly improve your RV’s electrical system. Whether you’re dealing with a faulty switch or upgrading to a model with higher amperage or additional features, understanding the process is key to a successful installation. This section details the steps involved in replacing a battery switch, considerations for upgrades, and installation procedures for different switch types.
Battery Switch Replacement Procedure
Replacing a battery switch requires careful attention to safety and proper wiring techniques. Always disconnect the battery’s negative terminal before beginning any work on the electrical system. This prevents accidental shocks and short circuits. The following steps Artikel the process:
- Identify and Access the Battery Switch: Locate your battery switch, usually near the batteries themselves. You’ll need to access it, possibly removing panels or compartments.
- Disconnect Wiring: Carefully disconnect the wiring harness from the switch. Take photos or make detailed notes of which wire goes where. Many switches use color-coded wires for a reason – follow the color coding. Labeling each wire with masking tape and a marker is highly recommended.
- Remove the Old Switch: Once the wiring is disconnected, remove the old battery switch from its mounting location. This might involve unscrewing it or removing mounting brackets.
- Install the New Switch: Carefully mount the new battery switch in the same location as the old one. Ensure it’s securely fastened.
- Reconnect Wiring: Reconnect the wiring harness to the new switch, ensuring each wire is connected to its corresponding terminal. Double-check your notes or photos to ensure accuracy. If the new switch has different terminal configurations, consult its wiring diagram.
- Test the Switch: Reconnect the battery’s negative terminal. Test the switch to ensure it functions correctly. Use a multimeter to check voltage at various points in the circuit to confirm proper operation.
Imagine the wiring harness as a bundle of nerves connecting the switch to the battery and other electrical components. Each wire carries a specific current, so accuracy in reconnection is vital. The terminals on the switch are the points where these wires connect, often secured with screws or clamps. Connectors, sometimes included with the wiring harness, provide a quick-disconnect option.
Factors to Consider When Upgrading a Battery Switch
Upgrading your battery switch might involve choosing a model with a higher amperage rating to accommodate more powerful appliances or a larger battery bank. Some switches offer additional features like multiple battery banks, allowing you to manage separate battery systems (like a starting battery and a house battery) independently. Consider the size and mounting style to ensure compatibility with your existing setup.
For instance, upgrading from a simple on/off switch to a Perko switch adds the ability to isolate different battery banks.
Installation Procedures for Different Battery Switch Types
Installation procedures vary slightly depending on the switch type. A simple on/off switch will have fewer connections than a more complex switch with multiple banks or additional features. Always consult the manufacturer’s instructions for your specific switch model. However, the general principles Artikeld above remain consistent: disconnect, remove, install, reconnect, and test.
Connecting and Securing Battery Cables
Properly connecting and securing battery cables is crucial for safety and performance. Use appropriately sized cables and ensure they’re tightly fastened to the terminals. Use terminal ends that are the correct size for the switch’s terminals, and apply anti-corrosion grease to prevent oxidation and ensure a good connection. Never force connections, as this can damage the terminals or cables.
A poor connection can lead to overheating, voltage drop, and potentially a fire hazard.
Mastering your travel trailer’s battery switch is more than just knowing how to flip a switch; it’s about understanding your RV’s electrical system and preventing costly problems. By following the maintenance tips, troubleshooting steps, and safety precautions Artikeld here, you can keep your batteries healthy, your appliances running smoothly, and your camping adventures worry-free. So, get out there and enjoy the open road!
Quick FAQs: Battery Switch On Travel Trailer Function
What happens if my battery switch is left in the OFF position?
Leaving your battery switch OFF will completely disconnect your house batteries from the charging system and any other connected appliances. This prevents your batteries from draining, but also means you won’t have power to anything in your RV.
How often should I check my battery switch connections?
Inspect your battery switch connections at least once a year, or more frequently if you notice any signs of corrosion or loose connections. This is particularly important in humid or salty environments.
Can I use a battery switch with different amperage ratings?
No. Using a battery switch with an amperage rating lower than your system’s requirements can lead to overheating and potential fire hazards. Always use a switch with a sufficient amperage rating for your system.
What size fuses should I use with my battery switch?
The correct fuse size depends on the amperage rating of your battery switch and the wiring in your system. Consult your RV’s wiring diagram or a qualified electrician to determine the appropriate fuse size.
